Sunday, February 19, 2023

FOOWIN Portable 15.6" monitor

I recently purchased a FOOWIN portable 15.6” monitor ( model A02 ) and I decided to post some initial thoughts / tests.

In addition to the monitor itself, it came with a few cables:
  • Mini-HDMI to HDMI cable
  • USB-C to USB-C
  • USB-C to USB-A (for power)
  • USB-C to USB-A female (for keyboard / mouse)
I have most of the cables I would have needed, but having spares is always good and I didn’t have a mini-HDMI to HDMI at all so the inclusion of that cable was really helpful.

The monitor supports video via USB-C and mini-HDMI ports, so I tested a few devices with the monitor.

Test 1 - Connected to Chromebook Duet

I connected the monitor to my Chromebook Duet using a USB-C to USB-C cable (no separate power for the monitor).  Just using the screen worked fine, I did notice a red tint until I changed the color temp from 6500 to 9300.  I tried a YouTube video that played fine, the audio seemed a bit low but still worked.  I tried to play Netflix using the Android app, but no video was displayed however when I tried Netflix via the website it worked fine so it is probably some copy protection thing.

When I connected direct power to the monitor, the brightness increased and I noticed that my Chromebook actually registered that it was being charged slowly which was nice.

Test 2 - Nintendo Switch

I connected the monitor to a Nintendo Switch.  The Switch didn’t have enough power, so I had to also directly power the monitor.  After that, the Switch video came up and the Switch itself showed that it was charging.

Test 3 - Raspberry Pi

I have a Raspberry Pi 4 that is in an Argon ONE v2 case (that has full size HDMI ports).  I was able to use the included HDMI to mini-HDMI cable and it worked fine.  On a later test, I was able to power the monitor and the Pi 4 using a portable battery bank that I had.

Bottom line: The FOOWIN monitor is pretty useful and the included cables makes this a nice little kit.  Just keep in mind there might be limitations on Android apps ability to display video, but otherwise it worked fine for the other scenarios that I tested.

Tuesday, October 18, 2022

GL.iNet Mini Smart Router Mango (Model GL-MT300N-V2) Thoughts

Lately most of my posts have been web3 related ( NFT / crypto ), but I decided to shift gears a bit.  I am not going to do a full deep dive review of this product, there are plenty online.  I did want to share my thoughts on the setup and use.

I purchased a Mini Smart Router ( Mango, model GL-MT300N-V2 ) from GL.iNet.  From time to time I would research OpenWRT compatible routers, and GL.iNet products would come up because they are OpenWRT based and many (but not all) seem to be supported by full OpenWRT releases.  I saw a good deal on Amazon and just decided to snag the Mango as a low cost entry point.

GL.iNet Mango ( GL-MT300N-V2 )

So first things first, I didn't have a pressing need for a travel router.  I have played around with OpenWRT on other devices ( RAVPower RP-WD03 and a Raspberry Pi 4 ) so I was familiar with the setup and use.  Ultimately I purchased the Mango as a cool gadget just for the fun of it.

Initial unpacking notes:
  • The device is small and light.  I expected it to be small, but it was lighter than I expected.
  • It comes with an Ethernet and USB-A to microUSB cable, which is a nice touch especially if you don't have many spare Ethernet cables.
Setup 1 - Initial setup

I didn't get creative here, I just followed the directions in the box.  My goal was to set the device up as a Wi-Fi repeater for my home network.  One thing to keep in mind, this device only supports 2.4 Ghz not 5 Ghz.  I was up and running pretty quickly with this option, the software is easy to setup.  Using Speedtest, my download speeds were a bit slower than connecting directly to my 2.4 Ghz network but still usable.  I looked around the interface, it seems much more user friendly than the LuCI interface on OpenWRT.

Setup 2 - Tethering

I wanted to try using the tether option via my smartphone.  Of course my phone can just run its own hotspot, but sometimes you just have to try things out.  I put my phone ( Pixel 6 Pro ) in USB tethering mode, and I was able to get it to work.  My first test had decent speeds, but that is because the Mango re-connected to my Wi-Fi (by default it will try to reconnect).  Once I disabled the reconnect option and tried again, I got the painfully slow speeds that I expected since my plan doesn't include high speed tether.  However the important thing is, the option worked.

Setup 3 - Access Point

For my next test, I just connected one of my extra LAN cables to the WAN port of my Mango.  I didn't have to change any settings for things to work.  I really like the fact that minimal configuration is required.

Android App

I checked the Play Store and an app ( https://play.google.com/store/apps/details?id=xyz.goodcloud.glinet ) that is actually pretty nice and seems to come from Gl.iNet.  From what I can tell you can access most of the same configuration options that you can via the web interface.  It has a "cloud" option that you can use to remotely connect/control, but I didn't test that.

NOTE: I tried to setup the Wi-Fi to support for WPA3 and after that I couldn't connect, luckily I just had to hold the reset down for like 10 seconds and set things up again which was easy.  Not sure why that didn't work, I will research it later.

VPN

This took a little more work to figure out how to figure, but I was able to configure the device as a VPN client.  The coolest part is that there is a switch on the side that you can use to manually turn the VPN on and off.

Additional thoughts

After using the device for a while and playing around in the interface, I noticed a few things that I thought were pretty neat:
  • The default setup seems to include mwan3 (Multi WAN load balancing).  So if you have Ethernet to one provider and Wi-Fi to another it can automatically switch between the two and I think it does some level of load balancing.  You can read up on that a bit more here ( https://openwrt.org/docs/guide-user/network/wan/multiwan/mwan3 ).
  • You can enable LuCI ( the default interface of OpenWRT ) to basically get more configuration options like you would with a traditional OpenWRT device.  This does not replace the GL.iNet interface which I actually like, it is just like adding a "power user" set of options.
Bottom line: So far I like the little router and might consider other GL.iNet devices in the future.

GL.iNet Product Page: https://www.gl-inet.com/products/gl-mt300n-v2/
Amazon Product Page: https://www.amazon.com/dp/B073TSK26W/

Friday, October 14, 2022

Floor - NFT Portfolio App

As I started to get more involved in the world of web3/NFTs, one of the areas I started to play around with was related to applications that let you see your portfolio of NFTs and wallet activity.

- Some apps would show the NFTs you own, and the total value of ETH but no activity.  If you had multiple wallets, you had to go into each one to see your view.
- Other apps did a good job of pulling all your collections into a single view or even showing collections, but not showing activity.
- I really like the Ledger Live app because I can see activity across multiple wallets on my Ledger, but it didn't really do a good job of showing my NFTs and it was limited to the Ledger wallets.  Most users that have a Ledger also have a software wallet, which was true for me.  So while I really like Ledger Live, I couldn't use it for my non-Ledger wallets.

So one day, in Discord (if your into web3/NFT chances are you hang out in many different servers) someone was sharing information on an app called Floor.  I like to try new things, and it seemed like it might work my goals so I decided to give it a shot.  For this app you actually have to have a pass, in the form of a NFT, so the person that shared the info actually send me a NFT to unlock the app.  This was already starting off to be pretty interesting!

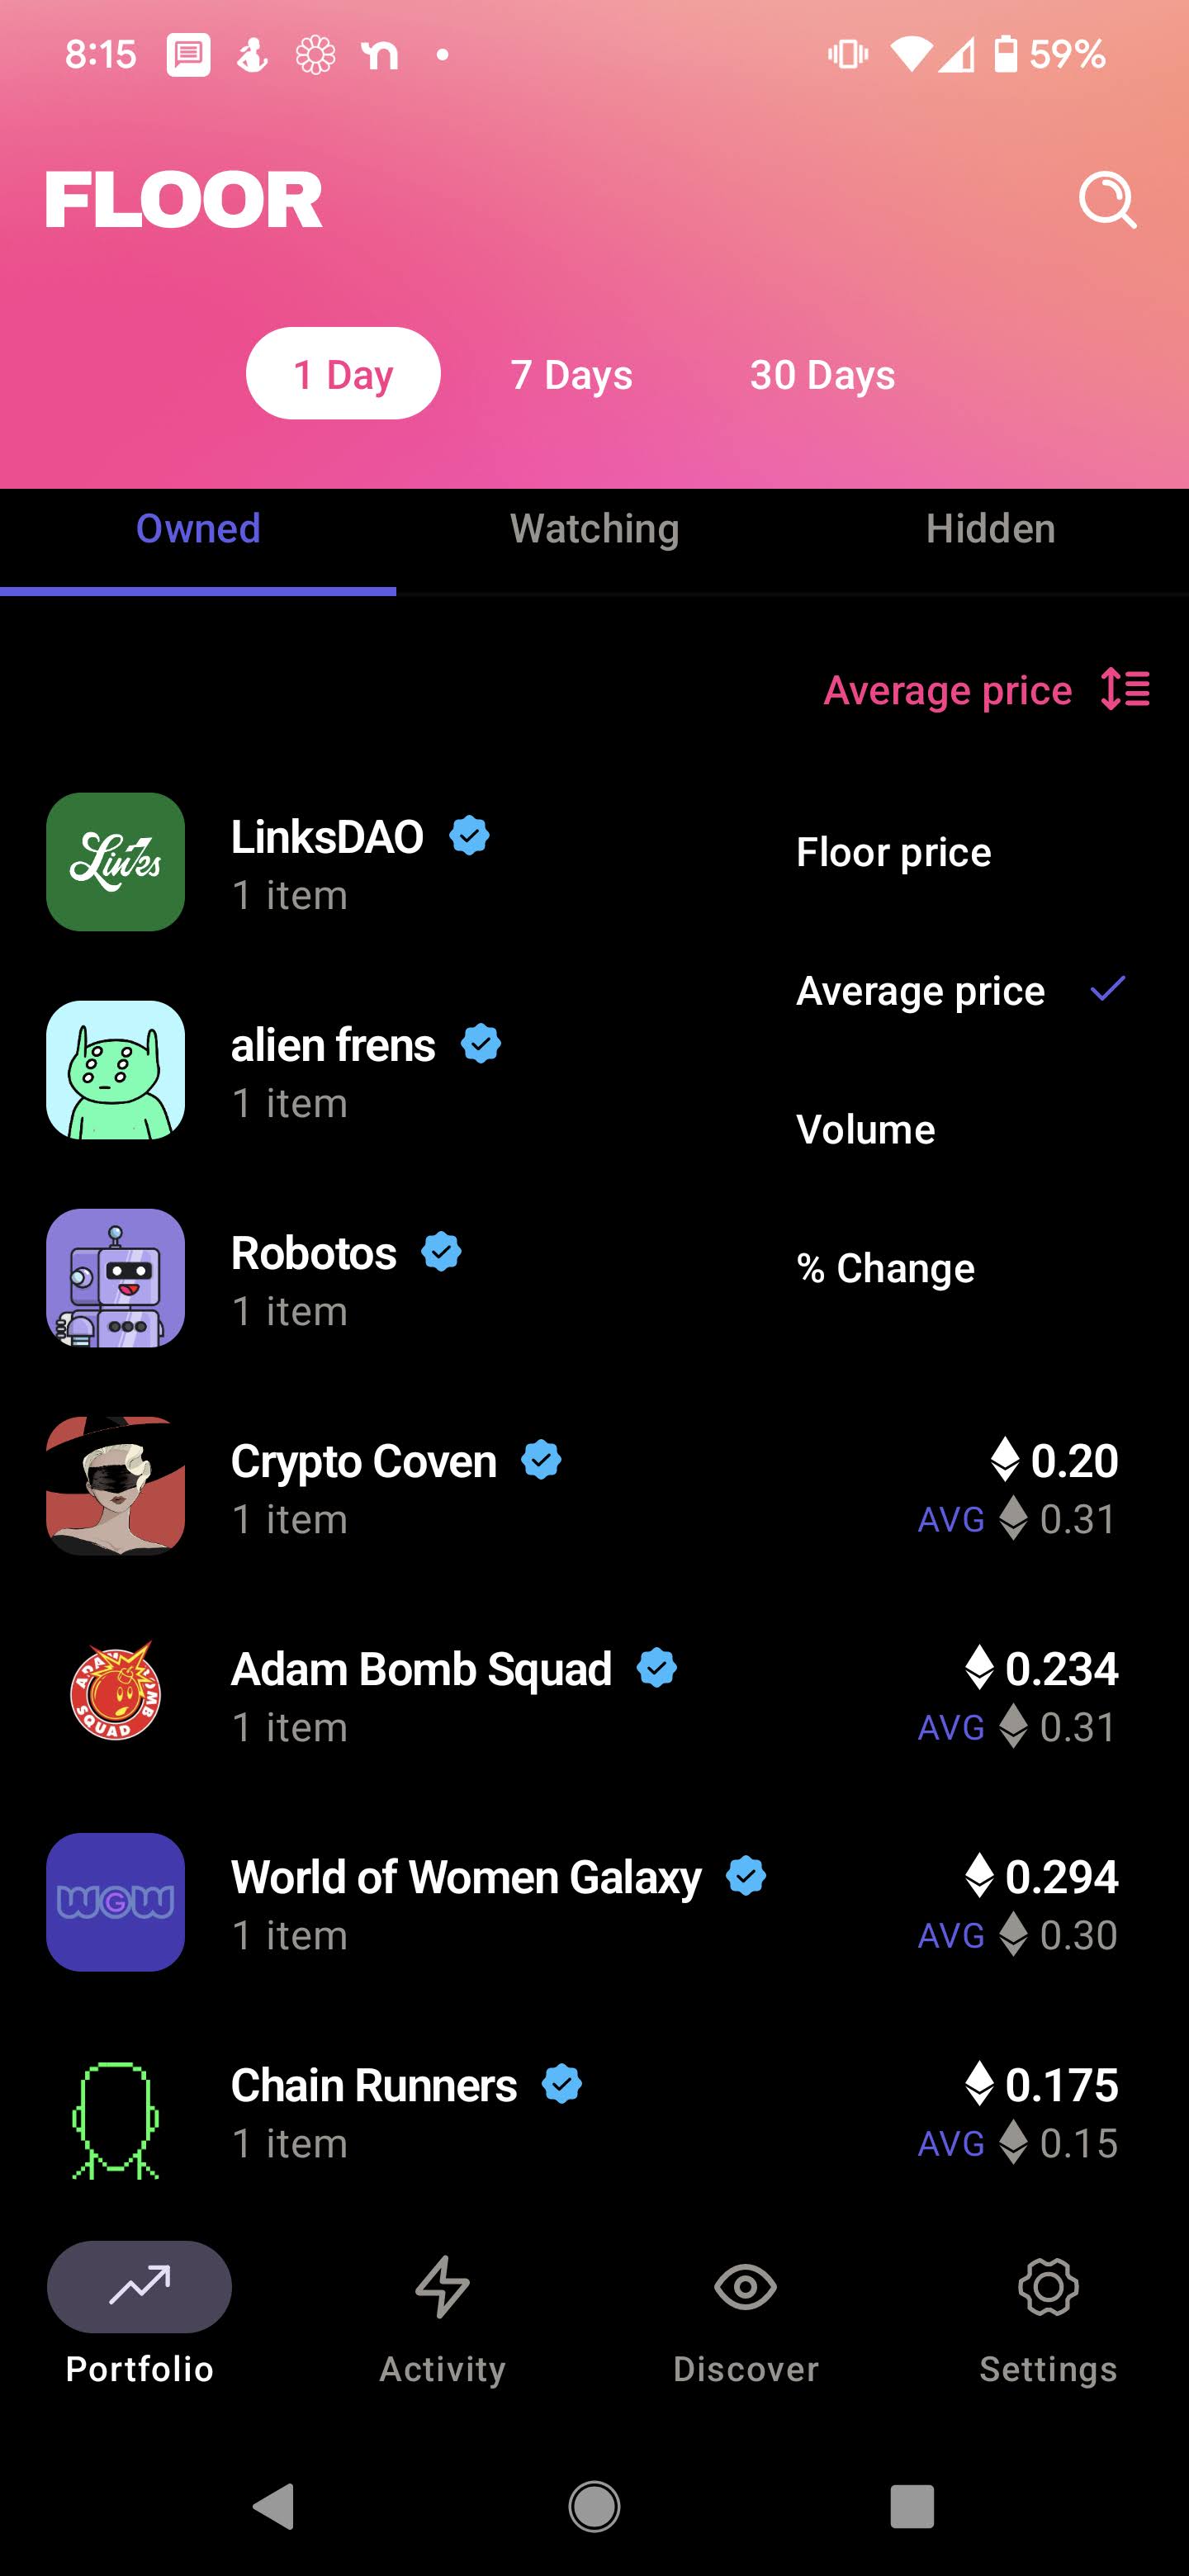
So, how is the app?  Here is a quick walk-through (NOTE - I used a demo wallet address, these are not my NFTs.  Screenshots based on Android version 0.21.4) with some of my thoughts:

Portfolio - Owned

Once you have the initial setup done, the app will open up to your Portfolio view.  Not only does it show you an estimated portfolio value for your NFTs, it also shows your ETH balance.  You can add multiple wallets.


As you can see above, you can sort you collections by Floor Price, Average Price, Volume and % Change which is a great way to keep an eye the collections which you own NFTs for.  You can also watch any collections that you don't own NFTs for, just to keep an eye on them.

Portfolio - Owned ( Collection )

If you click on a collection, you get 4 tabs at the top (note if you are only watching a collection and do not own NFTs you get the same tabs except "Assets".

Overview: This shows some high level information, details about the collection and various links such as "View on OpenSea" to look at the collection.


Assets: This shows the NFTs you own in the collection.


Activity: This shows recent activity in the collection including listing and sales which is a great way to keep an eye on things.


Listings: If you are looking to add more to your collection, or buy an item from a collection you are watching, this view gives you a quick look at what is available.


Activity

In this view you can see all the NFT activity across your multiple wallets.


Discover

In the Discover view, you get useful information.  Two of the main items you use see are Biggest Movers and Highest Volume.  This is a great way to keep an eye on what new collections might be worth keeping an eye on.


Settings

Nothing too crazy here, you can add wallets and adjust a few display options to your preference.


What else?

One of the things I like about this app/project is that the developers seem very open to feedback.  I have submitted multiple tickets with ideas/suggestions, and they respond often asking for clarification to ensure they understand my request.  I doubt you will get that with many other tools.

So back to where I started, the person who granted me access was actually part of a program they have where people who want to share this app can share it with others.  If you read this far, then maybe you are interested in trying the app?  It doesn't cost anything - you don't even have to pay gas to get the NFT!

If you want my help, all I ask is that you sincerely have an interest in this type of application and that you plan to use it.  As far as I know, I don't get any sort of "kick back" for bringing a new person in - I just really like sharing useful information, which is really what drives me to post on my blog.

If I sent you this link, just let me know if you are interested.  If you ran across it randomly, keep an eye on this page and I will add a way to contact me.  You can also post a comment to let you know you are interested.  Let me know your twitter handle, and I will message you.

Saturday, September 17, 2022

ENS Subdomains

Earlier this year I wrote a blog post about Web3 identity.  At the time I touched on ENS, but didn't really dive into it much.

I finally decided to register my own ENS name, and one of the features I found pretty cool was the ability to create subdomains.  So let's say you register "example.eth" as your domain.  You could create a subdomain (in the format subdomain.example.eth).  You don't have to pay another registration fee, just a little gas.  You can even assign ownership of a subdomain to another person.

So why would you do this?  Here are a few reasons
  • You can make a .eth subdomain specific to a project ( blokpax.example.eth )
  • You can make a .eth subdomain specific to your Discord ID
  • You can make a .eth subdomain for friends/family
  • You can make a .eth subdomain for each wallet/purpose ( freemint.example.eth, vault.example.eth )
  • Each domain can have a different address and even different controller.
If you already have an ENS domain, you can create a subdomain by doing the following:
  1. Go to ( https://app.ens.domains/ )
  2. Click "My Account" top right
  3. Under either "Registrant" or "Controller" find the domain you want to add a subdomain to and click it.
  4. Click "Subdomains" and click "Add Subdomain"
  5. Put in the name you want and click "Save"
  6. Pay the gas and that is basically it.  You can now manage the subdomain like your main eth domain.
One heads up / warning.  If you get a subdomain from someone else (person or project) just keep in mind they have the ability to take the domain back.

I hope this information is useful!  I will revise/add info if I get any questions.

Saturday, September 10, 2022

Ledger Nano S Plus - Setup and initial thoughts

I recently obtained a Ledger Nano S Plus.  It was custom branded for Tribe X, one of the NFT projects that I am participating in.  The packaging was very nice and simple, it included the device itself, paperwork, a USB A to C cable and a keychain loop.


Setup - Initial setup

I went to www.ledger.com/start to get the process going.  For my first test/setup, I was just going to create a new wallet like a normal new user would.  The process went pretty smooth, and I was up and running on my Ledger pretty quickly.

A few recommendations:
  • Make sure you pay attention to the setup screen information, it is useful especially for a new user.
  • Make sure you write down your recovery phrase on a paper, do not store it in a file on your computer - that would defeat the entire purpose of an offline/cold wallet.

Setup - Recover prior software wallet

First, let me say that my next test was just a test and you should NOT do this for actual long term use of your device.  I already had a prior software wallet, so I decided to recover that wallet onto my Ledger.  This is a HORRIBLE idea from a security perspective since it defeats the purpose of a hardware wallet but for testing it was fine.  As expected all my old stuff showed up fine, so I plan to use this setup for testing to see how it impacts things for me.  Most of the services I deal with support WalletConnect, which is supported by Ledger Live (the desktop/mobile app that interfaces with the Ledger device).  I had one site that doesn’t support WalletConnect, but MetaMask did work.  The only thing I don’t like is you can’t get to the point of using Ledger in MetaMask if you don’t have a MetaMask account setup.  However for most users, they likely have a MM account so this shouldn’t be a problem.

FIDO U2F Support

While the Ledger is mainly focused on crypto, it does have a feature that users should look into a security capability for their online accounts.  The Ledger can support FIDO U2F (two-factor authentication).  You can read up on Ledger’s info on this feature here ( https://www.ledger.com/fido-u2f/ ).  If you read my blog, you know that I have tested Yubikey hardware tokens.  For the Ledger implementation, two things stood out as interesting:

  • The Ledger is PIN protected, so someone can’t use your hardware token if they don’t know your PIN.
  • You can restore your recovery phrase on another Ledger wallet and get access to your FIDO U2F again.
From a security standpoint the ability to recover your key onto another device means that if someone gets your crypto private key, they can restore onto a Ledger and also get access to your FIDO U2F so depending on how paranoid you are that might be a bad thing.  However it also means that, as long as you know your crypt recovery info you can always restore your FIDO U2F access on a Ledger device.

Thoughts so far

The increased security adds some complexity to the process.  If you are used to just having a software wallet like MetaMask, you now have to remember to keep your Ledger nearby.  However the increased security, keeping your key on a hardware device and not in your software, is worth it for anyone in the crypto/NFT world in my opinion.  Remember, this helps to secure your private key but you still have to be careful with the sites you interact with.  Ideally you keep your hardware wallet for “trusted” sites and never use it for minting and maybe do your minting type activities on a software wallet to keep some separation.  If you already have a software wallet, just move your valuable NFTs to your Ledger and keep using the software wallet for minting.