Sunday, April 8, 2018

RAVPower Multi-Purpose Pocket Tool Kit Review (Model RP-TL001)

Disclosure of Material Connection: I received this product for free so that I could provide product feedback to the company and post a product review. I was not required to write a positive review and I do not rate products higher than they should have been. I am disclosing this in accordance with the Federal Trade Commission's requirements.

I recently received a RAVPower Multi-Purpose Pocket Tool Kit for a product review. In addition to the main tool itself, the package included a pouch and 9 screwdriver bits in a little holder.


The tool itself is wide.  To compare, I grabbed a pocket knife and multi-tool that I had and together they were about as wide as the RAVPower pocket tool.  The pocket tool also combined features of both - it had some of the tool of my multi-tool, and had a larger blade like my pocket knife.


I haven't used the pocket tool heavily, but for tasks around the house ( cutting open boxes and tightening screws ) it works just fine.


The only real problem I had with this pocket tool is the pouch itself.  The design of the pouch makes it stick out a good bit.  Additionally, inside the pouch there is a little part for the screwdriver bits but the piece of material that holds it in also causes the pocket tool to catch the material when you try to put it in.  In additional to this, the tool fits deep into the pouch.  So basically putting the pocket tool in and out of the pouch isn't as easy as I would expect, but you can still do it with one hand.

I plan to keep using this pocket tool and will update this post as needed.  Here are the main points I noticed about this pocket tool:

Knife: As a knife, the blade is sharp and has a saw part to help with cutting.

Multi-Tool: As a multi-tool, it has the common items you might need ( for example pliers/wire cutters, and can/bottle openers ).  The multiple screw driver bits also make this a handy single tool for many different quick jobs.

Pouch: The pouch could use some design changes, but overall it works.

Bottom line: As a pocket tool with a knife, this could be a useful tool to have around the house or in the car.

RAVPower Product Page: https://www.ravpower.com/RP-TL001-Pocket-Knife-Plier-Kit.html
Amazon Product Page: https://www.amazon.com/gp/product/B078YVDWRP

Sunday, January 7, 2018

Inateck 2.5" HD RAID Enclosure Review ( Model FE2101 )

Disclosure of Material Connection: I received this product for free so that I could provide product feedback to the company and post a product review. I was not required to write a positive review and I do not rate products higher than they should have been. I am disclosing this in accordance with the Federal Trade Commission's requirements.

NOTE: Inateck provided a 10% coupon code for my blog readers!  Code is at the bottom of the page.

I recently received an Inateck 2.5" HD RAID enclosure ( model FE2101 ) for a product review.  Here is what came with the product:

- FE2101 Enclosure
- USB-A to USB-C Cable
- USB-C to USB-C Cable
- Screwdriver and 4 HD screws
- Instruction Manual

FE2101 Enclosure

Reset Button  / USB-C / microUSB for power (optional)

USB cables
Plastic bag: 4 HD screws and a screwdriver

Little optional stand you can put under the enclosure
The drive supports 4 modes, you can read the full descriptions on the product info but my quick explanation is below:

NO-RAID: Basically you see the two independent drives as if you had two external cases/drives.
JBOD: Shows up as one large drive.
RAID0: The data is striped across the two drives, which should give a performance boost but a failure of either drive would cause data loss.
RAID1: The data is mirrored on both drives.

This is important.  The drive supports a maximum height of 8mm HDD/SDD drives.  So make sure your drives are compatible.  The two 7200RPM 160GB drives I had for testing were not compatible, so I had to get a bit creative.  Long story short, I removed the circuit board from the enclosure assembly and was able to do my testing that way.

Try slides out of the enclosure

Other side of the tray

Removed 2 screws to see the internals

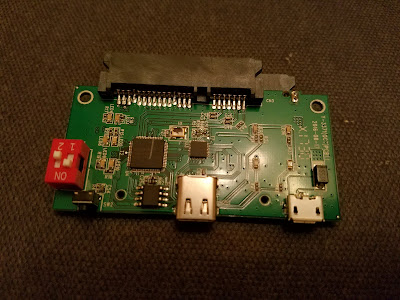
This is where the magic happens
Once I had the two 160GB drives installed, I ran some quick benchmarks.  Here is a summary of what I noticed:

- NO-RAID mode performance was similar to the speeds I saw with my Inateck FD2002 HD dock.
- JBOD mode showed up as a 320GB drive, and had similar numbers as the NO-RAID mode which makes sense because JBOD just seems to write the data sequentially on one drive then another.
- RAID0 mode showed up as a 320GB drive, but there was a definite increase in performance.  For example, it went from an average of around 65 MB/sec to 126 MB/sec basically doubling the performance.  The burst rate also increased but not as much.
- RAID1 mode showed up as a 160GB drive, and showed no real performance difference from the NO-RAID mode.  I did not expect performance increase here, but it was nice to see that there was no major decrease either.

One interesting thing I noticed is that the drive hardware (in Windows) has "ASM1352R" in the name, so at least my unit seems to be using the ASMedia ASM1352R host controller.  I also noticed the name would be different depending on the mode, for example RAID0 showed "ASM1352R-Fast" while RAID1 showed "ASM1352R-Safe".

For now I am going to keep the drive in RAID1 mode and keep playing around with it.  While I do NOT recommend you do this, I was able to cut the plastic tray and get my drives to fit.  I almost had to shove it into the enclosure so I would not recommend you do this as the unit was only designed to handle 8mm (maximum) drives.

Update: I decided to test the RAID-1 (mirror) mode to see how it would react to a drive failure.  Here is how I tested:

- Started with two drives (160GB and 320GB) and installed Ubuntu.
- Removed 320GB drive from Disc 2 slot, simulating complete drive failure
- Disk 2 blue light stopped blinking, error light went solid red
- Ubuntu did not crash, it kept running fine
- Inserted another 160GB drive into Disk 2 slot
- Both blue lights begin to slowly pulse, red error light is still solid in Disk 2.  I think the RAID array is rebuilding itself at this point
- After a while the red error light goes off, the RAID rebuild is done.  I didn't time it.

I know this doesn't exactly simulate a real world failure since the drive would likely still work but have bad sectors, but it was still fun to try.

Here are the main points I noticed about this product:

Modes: Offers 4 modes to handle a variety of use case scenarios, but most users will probably use one of the two RAID modes.

Setup: Other than my issue with drive size (keep it under 8mm) the setup was VERY simple, just install the two drives and follow the directions on how to configure the unit.  Make sure you do not have data you need on the drives since it will need to be formatted.

Design: The case is small, and in addition to the USB-C port it has a standard microUSB port for power in case your USB port on the computer can't provide enough power.  The case itself looks nice, and comes with a little stand you can mount under it if you want.

Bottom line: Nice HD enclosure that supports two drives, and can support RAID 0 and RAID 1.

NOTE: Inateck provided a 10% coupon code for my blog readers!  Use the code "FE10OFF" on https://www.inateck.com/

Inateck Product Page: https://www.inateck.com/hard-drive-accessories/hdd-enclosures/inateck-fe2101-dark-gray.html

Friday, December 15, 2017

Anker PowerDrive+ 4 Ports USB-C Review

I just got an Anker PowerDrive+ 4 Ports USB-C ( model A2240 ) and I figured I would do a quick blog review with some pictures.  I have used many multi-port adapters before, they are very useful if you have multiple devices.  These days everyone has a phone or tablet they want to charge plus other devices (like dash cams) typically use USB power.

Side view
This adapter didn't come with any cables, just the adapter itself.  It has a neat little red ring around it that glows when plugged in, this might just seem like an extra feature with no value but it is very handy to ensure you are getting power - I have had other adapters "back out" of the cigarette lighter port and you really don't notice until your phone dies.

Red ring ( the switch is from my power supply )

4 ports  (green = QC 3.0)
The adapter itself has 4 ports:
- Two USB PowerIQ ports for your USB devices
- One Quick Charge (QC) 3.0 port for faster charging on compatible devices
- One USB-C port for USB-C devices

 To test the charger out, I used my home made power supply ( old ATX computer power supply with an on/off switch and cigarette lighter port) to power it up.  I then connected two large battery packs (one USB, one USB-C) and a Samsung S7 Edge on the QC port.  After about an hour, I checked the adapter and it didn't even feel warm to the touch.  All my devices were charging just fine, and the S7 Edge was showing quick charge mode.

Charging up multiple devices
( S7 Edge not connected since I used it for the picture )
Bottom line: This seems like a solid car charger, even if you don't have a USB-C phone today you can still use the other ports and be ready when you or someone else has a USB-C device to charge.

Anker Product Page: https://www.anker.com/products/variant/PowerDrive%2B-4-Ports-USB-C/A2240011
Amazon Product Page: https://www.amazon.com/Anker-Charge-Charger-PowerDrive-PowerIQ/dp/B01G5B069C

Thursday, December 14, 2017

NOCO Genius G750 and G1100 Charger and Maintainer


I have looked into NOCO chargers in the past but never purchased one until recently.  I recently saw some good prices ( Amazon lightning deals ) and ended up buying two units - the G750 and the G1100.


Here is a quick rundown of the features/specs (not a full list of course):

- Both units can charge 6V and 12V lead acid batteries and use a multiple step charging approach
- The G1100 can also support 12V Lithium-ion batteries
- The G750 is IP60 rated and the G1100 is IP65 rated.  So they have the same solid protection (1st digit, 6 which is basically dust tight) but different liquid protection (2nd digit).  The G750 (rating of 0) has no protection, and the G1100 (rating of 5) protects against "powerful water jets" so basically rain shouldn't be an issue but don't put it under water.
- Both units come with clamp connectors w/ integrated eyelets, and they have a range of adapter/cables that you can purchase.
- Both units come with a 5-year warranty which is impressive.  Assuming you keep the receipt and register the unit, 0-2.5 years is no charge and 2.5-5 years is 35% of MSRP.

G1100

G750


You can remove the screw and they end up being eyelets
that you can mount to your car battery terminals if you want

Cover on the connector, in case you decide to leave this connected to your car battery
If you aren't familiar with the NOCO units, read up on them they have some neat features ( battery recovery, diagnostics etc ).  Product info links: G750 and G1100

Once I got the units, I tried them on a 6V battery that I had from one of those kid ride on cars.  The G750 wouldn't even get started, so I put the original charger on it for a while.  I put the G750 on it again, and after a while it would given me an error light.  I figured maybe the G750 didn't have enough power to bring the dead battery back so I tried the G1100 and it also gave me an error indication.  Ultimately, the battery itself was just beyond repair - it had been sitting in the garage for a while and I didn't keep it charged (I should have gotten a NOCO unit a long time ago).

Trying to charge the 6V battery
I also tested the G1100 against a few car batteries.  Since these were cars that were used often/recently none of the batteries were dead or near dead, but as far as I could tell the charger was working.

Topping off a Optima car battery
Once I purchased a replacement 6V battery, I used the G750 to fully charge it.  One of the nice features about these units is that they work as battery maintainers.  You don't have to disconnect the charger just leave it plugged up - it will monitor the battery and top it off as needed.  For situations where you don't use the battery often, this is a great capability.

Charging the new 6V battery
Ultimately, I think the G750 is perfect for indoor / garage use to keep things like the kid ride on toys or other batteries charged and maintained.  However, if you plan to use it for cars that are outside of the garage I would recommend the G1100 due to the better IP65 rating.  Ultimately, I think the NOCO Genius chargers are very nice options and you just need to select the best one for your use.  Don't make my mistake and let a battery go bad before you decide to get a NOCO charger!

Wednesday, November 29, 2017

Otium adapter with 3-socket cigarette lighter and 4 USB ports - Review

My car has an "always-on" cigarette lighter, but I plan to plug a few things into it and wanted to have it turn on when the car does.  I know I could do a custom setup using a relay and some wiring, but I wanted a quick/easy setup for now.  After digging around online I narrowed in on an Otium adapter that had the following features:
  • 3-Socket cigarette lighter: This was important because I am using a FM transmitter until I decide to replace the radio
  • 4-port USB charger: This will allow my phone, passenger phone and two other devices (one being a dashcam probably)
  • On/off switch: Of course this was the most important aspect
  • Volt meter: This was more of a nifty way to see if the power was on or off, but also would allow me to monitor the voltage.

Once the unit arrived, I unpacked it and took a few pics.  Lately many of my blog posts have been apps/websites so I was looking forward to putting up a hardware post again.

Box

Device - Simple and clean design

3 sockets and 2 USB ports on the front
The red things are where the double sided tape is

Interesting design for the sockets

4 USB ports total (2 front, 2 side)

Next, I took it to the car to test it.  Everything seemed to work fine, and the cigarette lighter powered FM transmitter worked great. 

Installed


Close up, notice the voltage


I need to tidy up the cables at some point

Here are the main points I noticed about this product:

Plenty of ports: The 3 cigarette lighter ports allow you to use items that must plug in directly or have their own adapter, and the 4 USB ports should cover any other devices.

On/off switch: If you have an "always-on" cigarette lighter, then this is a must-have.

Volt meter: This is just a neat way to know the unit is working, and keep an eye on your battery voltage / charging system.

Bottom line: So far I am very happy with this little unit.  I need to see if I can hide the wires and tidy up the install a bit, but I don't plan to use the double sided tape to mount it to anything just because I want to avoid residue being left behind if I remove it.   I will update this post if needed as I continue to use this adapter.

Otium Product Page
Amazon Product Page: https://www.amazon.com/gp/product/B07169DMHM/