Saturday, January 10, 2026

Use USB-C PD to power non-USB-C devices with VFLEX - My Thoughts

Disclosure of Material Connection: Thanks to Werewolf for the free products. I was not required to write a review and did not give the company a chance to review my blog post prior to posting it. I am disclosing this in accordance with the Federal Trade Commission's requirements.

I recently ran across a giveaway on Reddit ( r/UsbcHardware ) for a product called VFLEX.  For the giveaway, they were giving one of the "base" units and a DIY adapter - you just had to pay shipping which I was happy to do.  I reached out to the company and they decided to throw in some extra items.

So first, let's get to the main product.  There are two key aspects:
  • VFLEX Base: A small adapter that basically negotiates the voltage you ask it to using the USB-C Power Delivery (PD) protocol.  Of course this means the power source, the VFLEX base and the power supply have to support the voltage you are requesting.
  • Adapter cable: The swappable cable can support many types of barrel plugs, and they have one with +/- level terminals for DIY situations.
Storage case with 3 base units
Nifty little storage case with 3 base units

Various barrel plugs and the DIY adapter

So how did I test it?  Here was my generic approach:
  • Using an Android app, I configured the target voltage on the base unit.  It seems other options (iOS, iPadOS, MacOS and web) are supported to configure the base unit.  Most of the devices I tested used 12V, but I did test other voltages.  
  • I connected the VFLEX adapter (and a USB-C power/volt meter) to the power supply to confirm the correct voltage was negotiated.
  • I connected the appropriate adapter cable to the base then plugged it into the device.
Below is the list of devices I tested and any notes
  • GL-iNet Marble (GL-B3000) home wireless router
  • GL-iNet Flint 3 (GL-BE9300) home wireless router
  • Dell Latitude 5590
    • The laptop requires 19.5V. While this voltage can technically be negotiated exactly using PPS (Programmable Power Supply), my specific power source was limited to fixed voltage rails, so I configured the VFLEX for 20V. While the VFLEX negotiated 20V successfully, the laptop limited current to ~1A. This seems to be a known Dell behavior; their laptops look for a proprietary signal from the original power brick’s ID pin. Without it, the laptop throttles charging speed as a safety measure. Verdict: Not a VFLEX limitation, but a Dell quirk to keep in mind.
  • Fujitsu Lifebook E546
  • BMAX B1 Mini (mini pc)
  • 12V DC brushless fan (old PC case fan) at 5V and 12V using the DIY adapter
  • External 2.5" USB HD enclosures ( Inateck FE2007 and one other model )
  • Blood pressure monitor (which was handy because the batteries were dead and I didn't have spares handy)
BMAX B1 Mini PC powered by VFLEX
BMAX B1 Mini PC

Flint 3 powered by VFLEX via battery pack
GL-iNet Flint 3 router running from a battery pack

12V DC fan powered by VFLEX
Fan connected to the DIY adapter

Ultimately, I was able to power every device I tested with no issue.  While the Dell laptop test didn't pull enough current, it seems to be due to how Dell handles their power adapters so I don't see it as a VFLEX limitation.

So bottom line, the VFLEX product is a great way to use USB-C power for devices that don't normally use USB-C power.  Why would you need this?
  • Reduce the amount of power bricks you take on travel or to remote work locations
  • Power devices from your car (or USB battery bank)
  • Replace damaged or missing power adapters
Also based on some high level research of my own, I wanted to share some insights on voltages you can get based on the USB PD protocol (but it also depends on what the power source allows).  I just focused on voltage but you also need to consider current for high current loads (seems 3A or lower is general supported).  Consider this unofficial and do your own research to verify as needed.  Always double-check your device’s requirements before plugging it in. Sending higher voltage than a device can support can result in a very bad day!
  • USB PD 1.0 supports 5V, 12V and 20V
  • USB PD 2.0 supports 5V, 9V, 15V and 20V
    • 12V not required but optionally supported as a fixed voltage profile
  • USB PD 3.0 supports 5V, 9V, 15V and 20V
    • (Optional) 12V fixed voltage profile
    • (Optional) Programmable Power Supply (PPS) supports 3.3V to 21V
  • USB PD 3.1 supports 5V, 9V, 15V and 20V
    • (Optional) 12V fixed voltage profile
    • (Optional) PPS supports 3.3V to 21V
    • (Optional) Extended Power Range (EPR) adds 28V, 36V and 48V.  EPR with Adjustable Voltage Supply (AVS) can support a range from 15V to whatever max is supported (28V/36V/48V) based on current.
Remember, the information above is just on the protocol you will need to check the specifications of your specific source to determine what it can support.  Also, it is important to note that any device you connect will get 5V power until the correct voltage is negotiated (or it will stay at 5V) but most devices can handle undervoltage.

This is a full list of what was sent to me:
  • VFLEX Starter Kit
    • 9 different adapter cables with various barrel plug sizes.
      • Note: On their website you can buy multiple adapters in a pack (Adapter Pack 1 and Adapter Pack 2), but most of my devices used an adapter from Pack 1.
    • 3 base units
    • A super handy storage case with 2 compartments so the cables fit nicely in the bottom
  • DIY Adapter
  • A tiny 30W single port charger
    • Supports 5V/9V/12V/15V/20V with a variable PPS range of 5V to 16V
  • A dual port 70W charger which was way smaller than I expected
    • Supports 5V/9V/12V/15V/20V with a variable PPS range of 5V to 11V
  • 10000 mAh magnetic charging bank that works great on my Pixel 9 Pro XL
    • Supports 5V/9V/12V with a variable PPS range of 5V to 12V
Pixel 9 Pro XL with magnetic battery pack
Battery pack on my Pixel 9 Pro XL with UAG magnetic case

Bottom line:
 If you’re looking to declutter your "drawer of random power bricks" or want a way to power non-USB devices from a USB-C PD source, the VFLEX is an elegant solution. Whether you’re a hobbyist using the DIY terminals or a traveler trying to pack light, this belongs in your tech bag.  Grab the base + DIY adapter giveaway option (if it is available) and toss in "Adapter Pack 1" as a good start or just go all-in with the VFLEX Starter Kit.

Werewolf page: https://werewolf.us/

Thursday, January 1, 2026

Synology Virtual DSM (vDSM) Setup

I recently purchased a Synology NAS ( model DS220+ ), check out my initial thoughts post for a background on why I got one.  When you purchase a DS220+, you get a free license to run a Virtual DSM.

As the name implies, the Virtual DiskStation Manager (vDSM) is a virtual DSM instance that you can run on your Synology NAS.  I will admit that I don't have a solid use case for a vDSM yet, so at this point I just want to set one up to try the process and have it available.  As a note, I have upgraded my DS220+ so I have a total of 10GB of RAM.

Here are the high level setup steps:
  1. Install "Virtual Machine Manager" (VMM)
  2. Run VMM, go through initial setup wizard.
  3. In VMM, Create the image
    1. Go to Image > DSM Image and click "Add" to create an image.
    2. Click "Download Virtual DSM image" and download
    3. Click Next, choose your host and click "Done"
    4. The "Status" should start with "Downloading", wait until "Status" shows "Healthy"
  4. In VMM, create the VM
    1. Go to "Virtual Machine" > Create and choose "Synology Virtual DSM"
    2. Recommend name it something like "vDSM", use 1 CPU and 2GB of ram.
    3. For this test I just put 100GB for Virtual Disk 1 and use most of the defaults.
    4. I left Autostart as "No", I am sure I can change it later.
    5. Wait until "Status" shows "Powered off"
  5. In VMM, start your VM
    1. Click "Power on" for vDSM (or whatever you named it).
    2. Choose "Use existing license" since your NAS includes 1 free license.
    3. Once the status says "Running" wait until you see an IP assigned.
    4. Go to ( http://<ip address>:5000/ )
    5. Setup your new vDSM!
That is it.  You have a vDSM setup for whatever use case you come up with.  Some ideas I might try:
  • Mirror my basic configuration to test production updates
  • Test beta apps
  • Isolate services that are open to the internet directly

Wednesday, October 15, 2025

Synology DS220+ NAS - Initial Thoughts

Like most people that have a homelab setup, I have played with various approaches to network storage.  I have tried things like TrueNAS, a SMB share on my Rasperry Pi 4 and even using the network sharing feature of my GL-iNet router but I also have been looking at consumer NAS devices like Synology.

So why buy a product and not build my own?  I view my home network as supporting two goals: First I have my homelab goals, which has things my Proxmox setup and other stuff that I mess with just for fun.  Second I have the production goals, stuff like family entertainment devices and other things that just need to work.  So I wanted to get a NAS, but I wanted something that worked without constant tinkering so that I could support both production and homelab goals.

I did look at various vendors, but settled on Synology because the software seemed mature compared to other offerings.  Since the NAS would be sort of a starter for learning, I decided to get a 2-bay device and started to look at the various options/models.  Here are some of the variants I looked at:
  • The "j" series like the current DS223j, but I decided not to go that route because those have low RAM and seem to be underpowered.
  • The non-plus models like the current "DS223" that are better than the "j" series but seem to be lacking some features of the plus model.
  • The plus models like the current "DS224+" and "DS225+" that seem to the best of the 2 bay options.
I decided to go with an older plus model, and actually found a really good deal on a DS220+.

Setting up the NAS was pretty simple, and I was up and running very quicky.  After just two days of use, I wanted to share my initial thoughts and some key features/aspects that I have configured.
  • Setup SMB shares.  I would say this is the primary use case for any NAS, so it was a given that I would setup/use this first.  It works as expected, which is good.
  • Configure "home" drive for users.  The NAS can support multiple users, and creates a "home" drive for user to store their own files/photos.  It was easy to setup, and will likely make future use by family members even easier.
  • Setup two internal drives using Synology Hybrid RAID (SHR)-1 raid.
    • You can actually setup SHR-1 with a single drive (no redundancy) and then add another drive for redundancy (basically equivalent to RAID 1, mirroring) which is what I did in my initial setup.
    • One thing to keep in mind, the storage will be limited by the smaller drive so (as an example) if you have a 1TB and 3TB drive then the usable space is only 1TB.
  • Setup two external USB drives.  I have a USB 3 dock that allows you to dock two drives (either 2.5" or 3.5") which is a pretty nice way to connect external storage.
  • Setup QuickConnect ID.  Basically this is an easy to access your NAS from an external network.  I know most homelab/power users will consider other options (Tailscale or their own VPN setup) but this approach allows an easy option to get up and running and works with various mobile apps.
  • Setup Cloud Sync.  I created a specific folder on my Google Drive and OneDrive, and have that folder sync to my NAS so I have an easy way to determine which files I want on my NAS but also mirrored on my cloud storage.  This approach was mainly for testing, 
  • Setup "Log Center" to view logs, pretty simple but you can also have other devices send their logs to your NAS which is neat.
  • Setup "Synology Drive" basically think something like a Google Drive or OneDrive client for accessing your files.
  • Setup "Synology Photos", which is something like Google Photos backup but doesn't seem to have as many features.  It does support some AI features like determining faces which is neat, but I need to keep testing/using the app to better understand the features.
  • Setup "USB Copy".
    • As a test, I setup some tasks to mirror certain folders to external USB drives and it seems to work fine.
    • While I didn't use the feature, the NAS has a hardware "Copy" button on the front.  The idea is that you can insert a USB drive, then hit "copy" to save a copy of everything on the drive to the NAS.  While I don't know if I have a use case for this, it would be an interesting way to keep copies of files from something like a digital camera.
  • Setup "Hyper Backup" to testing backing up my NAS information to one of the external USB drives.
Bottom line: I am glad that I decided to grab a Synology DS220+ NAS, and just based on my initial testing I think it will support my goals and still allow for some tinkering.

Synology Page: https://www.synology.com/
Synology Hybrid RAID (SHR) info: https://kb.synology.com/en-us/DSM/tutorial/What_is_Synology_Hybrid_RAID_SHR

Sunday, January 12, 2025

Bambu Lab A1 Mini 3D Printer - My Thoughts

For Christmas, I got a Bambu Lab A1 Mini 3D printer.  I am not going to focus on a full product review ( there are plenty online ) or unboxing notes, I am just going to focus on my experience with it so far.

I have had the A1 mini for just over 2 weeks now, and it has been amazing.  I'll share a list of (almost) everything I have printed so far at the end of this article, but high level there are 3 sources I have used:

1) In the Bambu Handy (mobile) app you can browse a huge collection of prints from their MakerWorld ( https://makerworld.com/ ) site.  Just browse what they have or search for certain keywords, and chances are you can find something to print that you will like.

2) If you can't find what you need on MakerWorld, it is possible that someone else already designed what you need and posted it in another location.  You can do a google search and often come up with the files you need.  You can import those files into Bambu Studio (desktop app) to make it work, but might need to do some tweaking on settings.  I would get familiar with printing items using method #1 first before you start down this path.

3) All else fails, you might have to do your own design.  There are plenty of tools out there that you can use to make 3D designs and create the files you will need.  This is definitely an advanced level of the 3D printing process, but likely something you will sooner or later want to get into.

For me, I have printed from all 3 categories.  One thing I have really enjoyed is printing items that my family members could find useful and/or want.

A few main tips I want to share for new people:
  • Watch videos and read online for starter tips.
  • Join a group on Reddit/Facebook (or both) to start seeing common issues / tips.
  • Pay attention to print times and how much material will be used.
  • Keep your plate clean, it seems to help avoid issues based on everything I have read.
  • Take a look at my upgrades (list below) for ideas on possible improvements.
  • Keep an eye on your print jobs (especially the first few layers) and the filament to make sure it didn't get loose where it could get tangled, I had two failures because of filament getting tangled and now I pay attention to that issue.
  • When feeding the filament, it might get "stuck" in the tube and not feed.  I know it sounds odd, but pushing with some pressure will make a "click" noise and allow the filament to feed.  I saw this tip somewhere, and it helped me figure out feed issues.
Here is a full list of items I have printed broken out by category:

Upgrades for the A1 Mini ( Link to collection )
  • Bambu Scraper Grip - The printer came with a blade for a scraper but you had to print and build the handle, I recommend doing this as one of your first prints.
  • Universal Filament Clip v3 - This is a simple and useful way to clip the filament to the spool.
  • PTFE / Cable Clips - This helps keep your cables tidy.
  • A1 mini lube helper - I haven't used this but saw it on another video as a useful print.
  • Poop bucket - Yes I know it sounds odd, but the A1 mini has print waste (which the community calls poop) and you need a way to catch it to avoid a mess.  This little removable bucket makes it easy to dump, and could remove the bucket and put a larger catch under it.  There are many different solutions/designs but I liked this one the most.
  • Wyze Cam mount - I had a spare Wyze V2 cam to monitor my print jobs.  I know the printer has a built-in camera, but many people have suggested using an external one.
  • Filament tangle prevention - I actually had one or two issues related to the filament getting tangles, and this item should help prevent that.
Other random items from MakerWorld ( Link to collection )
  • Boat Model 010 - A little wind-up motor kit, the motor came with the printer and I printed the boat parts
  • Wireless Mouse 002 - A kit my wife got me with the 3D printer, it comes with the internal components for a wireless mouse and you print the shell.  I actually use the mouse daily now.
  • Pixel Watch Charging Stand - Nifty little stand for my Pixel Watch 2
  • Phone Charge Port Dust and Lint Cleaner - Simple print, I didn't really need it but why not!
  • Articulate Hate Snake (Traffic Cone) - Neat design my kiddo wanted printed
  • Dragon Smoke Bookmark - Neat design for my wife.  This was a bit trickier since I had to load it in Bambu Studio to add a pause so I could swap filament since it was two color.
  • Mayor Snake - The traffic cone was nice and all, but the mayor had a huge top hat.
  • Wood-carved puppy - Kiddo request
  • Sink Hole Cover - I had a hole in the kitchen sink that was unused, now it is covered.
  • Headset Holder - Nice spot to hang my headset on my desk.
  • Great Dane Low Poly model - Just a cool Great Dane design.
  • Lightweight stands for graded cards - This was too small for my Beckett slab but still nice.
  • Beckett Graded TCG Slab holder - Perfect size for my Beckett slab (thicker than PSA slabs from what I can tell)
  • DSI XL Replacement Stylus - This was a waste, only because the person who asked for it told me the wrong Nintendo DS model!
Other random items not from MakerWorld
  • Circuit Playground Express (CPX) Mount - A neat little mount for the CPX board
  • 3DS XL Stylus - I couldn't find a design for the 3DS on MakerWorld, but I found it on another site and then added it to MakerWorld ( https://makerworld.com/en/models/981153 ).
My own design
  • Small box - This was part of a tutorial for doing your own designs using Autodesk Fusion
  • Toy plug - The first design I did 100% myself.  I took measurements, designed it in Autodesk Fusion and printed it out.  Worked great!  I posted it on MakerWorld just because I felt it was cool that I did my own design ( https://makerworld.com/en/models/971736 ).
Bottom line: If you are looking for a 3D printer, the Bambu Lab A1 mini is a great product.  It has limitations on item size, but you have to start somewhere.

Tuesday, October 1, 2024

Homelab - XCP-ng

As I mentioned in an earlier post, I have started to play around with things tied to the idea of "homelab" setups.  I am not going to go into detail on what equipment I have, you can check out my other post here ( https://bigboystoys13.blogspot.com/2024/08/my-homelab-equipment.html ) for more information.

One of the cool things about the HP Envy desktop computer that I am using is that you can easily "hide" certain drives via the BIOS.  This makes it to do testing where you want to ensure certain drives can't be impacted.  I decided to setup XCP-ng on my machine, while keeping the Windows OS and Proxmox available.  My earlier post has details on my Proxmox setup.

Here is my approach (my HP Envy has 5 internal drives right now):
  • For Windows, I have a 256GB SSD and 1TB HDD.
  • For Proxmox, I have a 3TB HDD.
  • For XCP-ng, I have 256GB SSD.
Using the BIOS ability to hide certain internal (SATA) drives, I can basically hide the drives not being used.  So when I want to use XCP-ng, I hide the other drives.  While I can't easily swap between the systems (like you can a dual boot setup) it helps ensure I don't mess up one environment while using the another.

I actually tried XCP-ng first (before I decided to start making blog posts about the homelab stuff), then tried Proxmox.  While I am starting to like Proxmox, I decided to give XCP-ng another try.

Out of the box, Proxmox was easier.  You just install and can hit the server directly via a web link.  With TCP-ng you have to install a virtual machine that will act as configuration interface.  I do like that you can find a Windows client for XCP-ng, which I don't think exists for Proxmox.

Once I setup XCP-ng, I setup a VM for an Ubuntu workstation which was pretty easy to do.  After that, I made sure the host itself wasn't using the GPU card and then configured the Ubuntu host to use the GPU card.  I also configured USB passthrough for the keyboard and mouse ( https://docs.xcp-ng.org/compute/#passing-through-keyboards-and-mice has useful info ).

So think of it this way:
  • I power up my computer.
  • XCP-ng loads
  • Ubuntu VM auto-starts
  • Ubuntu loads up on the local computer
So basically I would be Ubuntu as a desktop OS, but it is running on XCP-ng which could also have other virtual systems running on it.  Unfortunately I couldn't get Ubuntu working on this setup, and I gave up on trying.  For now I am going to focus on Proxmox.

Pixel 8 Pro vs Pixel 9 Pro - My thoughts

When the Pixel 9 series details came out, I started to read up on the differences on the Pixel 8 Pro and Pixel 9 series, I didn't see enough changes to make me feel like I needed to upgrade.  Don't get me wrong, the Pixel 9 is impressive, but I wanted to be practical and try to stick with doing an upgrade on a two year cycle (my last upgrade was Pixel 6 Pro to Pixel 8 Pro).

I actually had a spare Pixel 8 Pro that I was looking to sell, and decided to trade it in for a Pixel 9 Pro.  I figured it would allow me (and a few family members) to try out the 9 Pro.  If no one liked it, then I could just sell it.  If everyone liked it, then hopefully I'll be allowed to keep it!

So to jump right into it here are the main differences I have noticed between the Pixel 8 Pro (P8P) and Pixel 9 Pro (P9P):

Screen size

The screen is smaller, going from 6.7" (P8P) to 6.3" (P9P).  However in day to day use, it really didn't matter that much.  The smaller screen wasn't an issue, and if I am doing something that really needs a big screen I have other devices.

Battery life.  

This is where I really noticed a difference.  The first week I got it, I fully charged it Wednesday night and other than putting it back on charge for like 10 minutes ( to apply an update) I didn't charge it again and the phone still had life on Friday.  I have the "AccuBattery Pro" app on both of my phones, and here are the full battery estimates (keep in mind the P9P data is just based on a few days):

Device: Pixel 8 Pro // Pixel 9 Pro
Screen on: 15h 54m // 19h 53m
Screen off: 63h 41m// 5d 13h
Combined used: 27h 42m // 42h 48m

So this is definitely an area of improvement, and this alone makes me tempted to keep using the Pixel 9 Pro as my daily driver.

Call Notes

So the Pixel 9 Pro has a "Call notes" feature.  I tested it one time, and here are some key takeaways:
  • It does let the other party know the call is being recorded.
  • It gives a pretty impressive summary of the call.
  • It gives a full transcript with the actual call recording.
I could see this feature being very useful when you take calls, but of course some people will not like having the call recorded.

Bottom line: At first I wasn't going to upgrade but based on the great deals I ended up getting a Pixel 9 Pro XL!

Ledger on Pixel 9 Pro

I recently got a Pixel 9 Pro XL.  I tried to connect my Ledger device ( a Nano S Plus ) to my Pixel, but the screen (on the Ledger) did not turn on.  At first, I assumed that the cable wasn't fully inserted (some cases cause issues) so I removed the case, and then tried another cable.  Nothing worked, so I grabbed my Chromebook Duet to verify the Ledger actually still worked (it did).

So far my testing narrowed the issue down to my Pixel 9 Pro XL.  I actually had access to a Pixel 9 Pro (not XL), and I did a quick test to confirm that it does work on a Pixel 9 Pro.

So bottom line, Ledger (Nano S Plus) with Android 14 (as of 10/1/2024) does not work with Pixel 9 Pro XL, but does work with the Pixel 9 Pro.  It could just be my device, but I saw other people post so I plan to see if I can confirm if they are using a 9 Pro XL.

As a short term fix, if you use a USB-C hub (and connect your Ledger to the hub) it works.  Hopefully someone stumbles across this post so they save the headache of trying to figure out what is wrong.  Also I plan to try to reach Google and open up a bug report.

Update: I submitted a feature request hopefully that works.  Please use the +1 vote option if you have the same issue:
Update 2: Well the issuetracker entry was basically closed, that isn't the right place to submit for Pixel issues.

Saturday, August 31, 2024

Homelab - Proxmox Setup

As I mentioned in my prior post, I have started to play around with things tied to the idea of "homelab" setups.  I am not going to go into detail on what equipment I have, you can check out my other post here ( https://bigboystoys13.blogspot.com/2024/08/my-homelab-equipment.html ) for more information.

One of the cool things about the HP Envy desktop computer that I am using is that you can easily "hide" certain drives via the BIOS.  This makes it to do testing where you want to ensure certain drives can't be impacted.  I decided to setup Proxmox on my machine, while keeping the Windows OS available.

Here is my approach (my HP Envy had 4 internal drives right now):
  • For Windows, I have a 256GB SSD and 1TB HDD.
  • For Proxmox, I have a 256GB SSD and 3TB HDD.
Using the BIOS ability to hide certain internal (SATA) drives, I can basically hide the drives not being used.  So when I want to use Proxmox, I hide the two drives tied to Windows.  While I can't easily swap between the two systems (like you can a dual boot setup) it helps ensure I don't mess up one environment while using the other.

I am not going to go into details on how I setup Proxmox since there are plenty of guides out there, but I will share a few high level points that I felt would be useful:
  • It is very easy to install Proxmox, but make sure you still read over the documentation.  On the install page instructions, it links to ( https://pve.proxmox.com/pve-docs/chapter-sysadmin.html ) which has good info.
  • Configure your updates: If you are using the free setup, you should go into updates > repositories to disable the two enterprise options and enable the "no-subscription" option.
  • If you plan to setup a cluster, you should do that before adding VMs.  I don't remember the exact issue, but I know I ran into some situation where I couldn't setup a cluster because one of the hosts already had VMs on it.
  • Keep notes on configuration in case you need to set things up again.
  • Check out https://tteck.github.io/Proxmox/ which has scripts to make it really easy to setup different capabilities (mainly containers).


Thursday, August 8, 2024

My homelab - Equipment

Disclosure of Material Connection: I received some of the items listed below for free, sometimes in exchange for a review.  I will note those items by putting *see disclosure* on the same row.  I was not required to write a positive review and I do not rate products higher than they should have been. I am disclosing this in accordance with the Federal Trade Commission's requirements.

It has been a while since I made a blog post.  Recently I decided to start playing around with computers a little more again, reading up on how people are doing their own “homelabs” to experiment and learn.  I don’t plan to do anything big or crazy, but I figured I’d document what I am doing on my blog.

For my first post, I am just going to layout the hardware I am using.  I figure if I write future posts, I can just mention this post if anyone wants to see the specific hardware I am using.  I am just mentioning the main/relevant items, not every single piece of gear and I will update as needed if I get new gear.

Equipment as of 8/30/2024:
  • HP Envy (desktop computer)
    • Computer Specs
      • Intel i7-4790 @ 3.6 Ghz
      • NVidia GeForce GTX 745
      • 32GB RAM
    • Internal storage
      • Micron 256GB SSD
      • SanDisk 256GB SSD
      • Seagate 3TB HDD
      • Toshiba 1TB HDD
      • SanDisk 16GB SSD built-in to the motherboard, works as cache for the HDD as long as you have the right software.
    • Connected items
      • Inateck FD2002 USB 3.0 dual SATA HDD docking station (my review) *see disclosure*
        • Useful for swapping drives out easily.
  • Fujitsu Lifebook E546 (laptop computer)
    • Specs
      • Intel i5-6200U @ 2.4 Ghz
      • 16GB RAM
      • Plextor 128GB SSD
  • Raspberry Pi 4
    • Specs
      • 4GB RAM
    • Argon ONE V2 Case (my review) *see disclosure*
    • Inateck FE2005 USB 3.0 enclosure (my review) *see disclosure* 
  • Misc equipment
    • Cudy 8-port 10/100/1000 Mbps Ethernet switch
    • GL-iNet Marble (GL-B3000)
    • GL-iNet Mango (GL-MT3000N-V2) qty 2

Tuesday, November 21, 2023

Redeem NTFs backed by real cards

An interesting aspect of NFTs is the idea of having an NFT that is backed by a real world item.  In the case of this post, I am going to focus on graded trading card slabs ( for example Pokemon cards or sports cards ).  I don’t know all the services that are out there, so I’ll just touch on the ones I have a NFT/card on.

One of my hesitations of using these services, or sending my own slabs in to be vaulted, is the cost of getting the real card back out if I decide I want the card back.  Here is a breakdown of the services and example costs:


This one is pretty simple.  To redeem a NFT and get the real card, there is no cost.

I do want to note that there is no way to send you your own slab to get it setup as a NFT backed by a real card in a vault, but the Blokpax project itself has cards.  Depending on how you get the card in the ecosystem, you might have to spend a few bucks in gas to transfer it to them for redemption since some (like one of my samples) are on Ethereum.  However, in other situations (for example if you get it from the Rewards Store like my other example) there is no cost.

Sample NFT/card(s):

Arena Club - https://www.arenaclub.com/ ( Get $10 with my referral https://arena.deals/6tzrSN )


With Arena club, you pay a $1 fee per card plus shipping (depends on location) and insurance (depends on value) to retrieve your card.  Here is an example cost estimate:

Retrieve card: $1
Insurance fee: $1
Return shipping fee: $7.84
Total: $9.84

I believe the vault is out in California, so shipping might be lower if you are closer.  Also you can use my referral link ( https://arena.deals/6tzrSN ) to save $10 off a purchase so that might help offset the redeem cost.

Sample NFT/card:

Courtyard.io - https://courtyard.io/


You pay shipping and tax to redeem your card.  Both are based on location and card value so ultimately it depends on where you are and what you redeem, but as an example here is the cost estimate for a card worth $50 going to the US (east coast):

Shipping cost $24.67
Tax $3.00 - $4.50
Total cost $27.67 - $29.17

The cheapest shipping is $15.41 for a card valued $500 or less close to the state of Utah, likely where the vault is or at least where they ship items from.

Sample NFT/card:

Bottom line: If you are considering one of these services, don’t forget there are other factors to consider such as buyer/seller fees and costs to send your slab in.  Also the services are not the same, for example Blokpax is part of a larger ecosystem with other projects and Arena Club offers their own card grading.  It seems like Courtyard is just focus on vaulting/marketplace capabilities right now.

Other relevant links

Courtyard.io - Asset Redemption & Shipping

Arena Club referral link

Wednesday, October 18, 2023

AKKO Warranty - Setup and thoughts

I have been with T-Mobile for a long time, and have always used their phone protection plans.  I have kicked around the idea of switching to another company for warranty over the years but never made the change.  Recently I started to take a serious look at the options, while T-Mobile’s offerings have always resolved my issues it is also pricey.  I never take advantage of JUMP, so that bonus doesn’t really come into play when I consider my pros/cons.

Ultimately I narrowed down my choices to AKKO and SquareTrade.  I have used SquareTrade for years (my first plans were back in 2014) for devices like smartwatches, Chromebooks and tablets and made multiple claims over the years.  I don’t remember ever having issues with SquareTrade, and I’d still recommend them today.  However, AKKO provided loss & theft protection ( SquareTrade doesn’t ), had lower deductibles and had options to cover other devices.  So ultimately I decided to go with AKKO, despite it being a newer company.

I finally decided to just go for it and sign up.  The sign-up process didn’t go perfectly, I ran into a few issues I would consider minor and some I am still working to resolve ( I will update if I get information from support on any of these ):

Signing up

I ran into a few issues during the sign-up process:

1) I was trying to use the “Connect your Bank” option, but the first bank I tried ended up not working.  The page would give an “access denied” type of error, but when I tried another bank it seemed to work.  Not a big issue, later support told me that I could have used a credit card and they still would have given me the $20 deductible credit.  Pretty good customer service focused response.

2) In the Android app, when I would select my birthday the actual date was 1 day off - not a big issue, I just picked the day before and it showed up correctly.  I let support know about this too, they said it was due to UTC vs local time so not really an error.

3) There was some vague error when I signed up, but I got a text message with information to finish activating my profile so I figured things were fine.

Initial Setup

Actually setting up the protection wasn’t difficult.  You do have to take front/back pictures of your phone, which is completely understandable.  I also had to provide a copy of the receipt.

Other thoughts/issues

After playing around with the app/site a bit more, a few more things popped up that were not major issues but could be areas for improvement:

1) When adding an item to be protected, you have to enter information like where it was purchased, when it was purchased and the price.  If you have had the item for a while, or it was a gift, these might be difficult to remember/find.  Some prompts to let you know “best guess” is ok for the date, or a box to mark it as a gift, might be helpful.

2) There isn’t a way to upload a PDF using the Android app, I could only select pictures.  In the app it says the following:

“You can upload any picture or PDF of your receipt here along with your item’s images or email a copy of your receipts to Receipts@getAKKO.com for us to keep track for you.”

When I sent my receipt to the email above, they advised me that they can’t manually upload receipts to a customer’s account and said I should just take a screenshot of the first page and upload it.  It was a bit confusing that the app would tell me to email the receipt, and then they tell me they can’t do anything with it.

3) The website has a “Evidence storage” section, where I was able to upload a PDF but that option doesn’t seem to be available in the application.  Also that area doesn’t allow you to add a note or name to the file, which would be really useful.  Being able to associate it to a specific item would be even better.

4) On the website, I went to “Your Stuff” and looked at the information for my phone.  The front and back photos would not show up, and neither would the receipt.  All of that information shows up correctly in the application, so I don’t know why the website and app do not match.

5) At one point dealing with an issue, support let me know that one of my phone pictures was a bit blurry.  Once I retook it, they said it was good.  However they said “Please do note it is still your responsibility to ensure that your device does not already contain any damage. Should you file a claim in the future, and a member of our claims team finds that these verification photos show existing damage upon detailed inspection, the claim could be denied.”

So this leaves me concerned.  I don’t like having to worry about a future review finding an issue.  I would prefer that when I add my device, it undergoes a QA review for the information, pictures and receipt.  At that point, once a record is marked “reviewed” they do not later re-review and say “oh wait we found an issue”.  If I have an item damaged and try to make a claim, it is too late to prove there was no damage.  I will try to send this feedback to the company and see what they say.  As a reminder, I didn’t ask them to check the pictures, they just proactively did it again so another plus for customer service.

6) When I go into “Billing” on the web I don’t see anything, and the application doesn’t show that I have a payment method setup.  Update: Support said this wasn’t an issue, nothing will show up now since I don’t owe anything.

Despite the issues above, anytime I contact the company via email or in the chat options they are pretty responsive and very helpful.  This is VERY important - being able to get help and information is very important.  I’ll try to find a way to share my other input with the company.

Bottom line: Overall despite various issues, I would consider most of them UI/UX type of issues that are not show stoppers yet.  I will keep adding more devices to my coverage, and keep reaching out to support on questions/issues.  I am going to stick with AKKO and see how this works out.

Use my referral code ( BigBoysToys13 ) to get your 1st month free.  For full disclosure, I also get a $20 credit if you sign up using my code so thanks!

Sign up here: https://getakko.com

Sunday, February 19, 2023

Display NFTs on Monitor

I recently purchased a 15.6" portable monitor and was thinking about what I could do with it.  My Raspberry Pi 4 was not being used, so I started to think about projects with both items.  Lately NFTs have been on my radar, so I figured why not look into displaying NTFs on a screen.

As I looked around online, I found some options including one called Zeroframe that I decided to try out.

Showing off Schrödinger Circuit
15.6" monitor, Raspberry Pi 4 and RAVPower power bank

Initial Setup

At the Zeroframe.art website, click “Sign In” at the top right.  I didn’t write down all the steps, but it was pretty straight forward.  Once you are logged in, here are the basic steps to get a test setup running and once you have a display working you can continue to explore the setup options.  The steps below align with the interface tabs:

Artworks - This is for the art itself.

Steps
  • Click “Add artwork”
  • Add the OpenSea URL of your NFT
  • Fill out “Title” and “Artist” if you want, otherwise it will default to info pulled from OS
  • Click “Save”
  • Review the title (normally the NFT #) and artist and edit if you want
For my test setup I added two NFTs ( Schrödinger Circuits and Lost Miners of the Ether ) as a start.

Collections - This is to group your art into collections

Steps
  • Click “Create collection”
  • Put in a collection name and hit save.
  • Next to the collection name click the > arrow.
  • Click “Add to collection” and pick the art you want to add.
  • Click on “Collections” to go back up a level.
As a note, you can add art to multiple collections.  I made 3 collections for my test setup: One for Lost Miners, one for circuits and one called “BPX Collective” that includes both NFTs.

Frames - Setup your actual displays.

Steps
  • Click “Create frame”
  • Put in the name of the frame, something so you know which device it is.
  • Don’t worry about the pairing code right now, just click “Save”.
For my setup I plan to use a Chromebook first for testing, then a Raspberry Pi for additional testing.

Exhibitions - Pulls it all together

Steps
  • Click “Create exhibition”
  • Put in a name and click “Save”
  • Click the > arrow next to the name, here you can select your frame and what artwork or collection to show off.
That is it, now you need to actually setup your display.  As you are first learning how to do things, I would just use a computer web browser or other device (Chromebook) first.  If you plan to implement something long term, you can consider other options like kiosk software that is focused on just displaying a certain URL.

I shared my setup directions below to hopefully help.

Chromebook as Frame

As a first test, I setup my Chromebook Duet as a display screen ( called a frame in Zeroframe). .

Steps (High level):
  • In the Zeroframe interface, go to “Frames” and under “Link” copy or write down the URL listed since that is what you will need to put into your device
  • I used the “Browse as Guest” option instead of logging into my account on the Chromebook
  • Go to the URL for the frame on the Chromebook
  • If it works you should see the frame name ( Chromebook Duet for me ) and “Waiting for artwork” at the top.
  • Go back to your Zeroframe interface, on the “Exhibitions” tab click the up arrow on the row for the exhibition you want to display.
If everything works, you should now see your NFTs on the screen.  Go back to the “Frames” page, and under “Plaque” if it has “None” try the various options.  If you have a large enough screen, I would use “Art info & QR” if you plan to put this in a place others can see it.  If this is for use at home use, you can probably leave it as “None”.

Raspberry Pi 4 as Frame

I will assume that you already have a Raspberry Pi 4 and are familiar enough with it to be able to get most of this done without step by step directions so my steps are high level.

15.6" monitor connected to Raspberry Pi 4

Raspberry Pi 4 in Argon ONE V2 Case

Steps (High level)
  • Use Raspberry Pi Imager to install the following onto a microSD card (4GB works)
    • OS: Other specific-purpose OS > FullPageOS > FullPageOS (Stable)
    • Click the gear and specify your wifi info unless you have your Pi wired via Ethernet.  Also set your locale while you are here.
  • Click “Storage” to make sure you have the right device selected
  • Click “Write”
  • Once it is done writing, remove and re-insert the SD card.
  • Edit the “/boot/fullpageos.txt” file to include the URL for the frame.
Bottom line: Based on my tests so far, everything worked and it was a cool way to show off various NFTs.  I did notice that I was on a "Public Beta" plan, so I wouldn't be surprised if this will require some paid plan in the future.

Video showing two test displayshttps://youtu.be/tHqp0B9Cdsk
Zeroframe Page: https://zeroframe.art/

FOOWIN Portable 15.6" monitor

I recently purchased a FOOWIN portable 15.6” monitor ( model A02 ) and I decided to post some initial thoughts / tests.

In addition to the monitor itself, it came with a few cables:
  • Mini-HDMI to HDMI cable
  • USB-C to USB-C
  • USB-C to USB-A (for power)
  • USB-C to USB-A female (for keyboard / mouse)
I have most of the cables I would have needed, but having spares is always good and I didn’t have a mini-HDMI to HDMI at all so the inclusion of that cable was really helpful.

The monitor supports video via USB-C and mini-HDMI ports, so I tested a few devices with the monitor.

Test 1 - Connected to Chromebook Duet

I connected the monitor to my Chromebook Duet using a USB-C to USB-C cable (no separate power for the monitor).  Just using the screen worked fine, I did notice a red tint until I changed the color temp from 6500 to 9300.  I tried a YouTube video that played fine, the audio seemed a bit low but still worked.  I tried to play Netflix using the Android app, but no video was displayed however when I tried Netflix via the website it worked fine so it is probably some copy protection thing.

When I connected direct power to the monitor, the brightness increased and I noticed that my Chromebook actually registered that it was being charged slowly which was nice.

Test 2 - Nintendo Switch

I connected the monitor to a Nintendo Switch.  The Switch didn’t have enough power, so I had to also directly power the monitor.  After that, the Switch video came up and the Switch itself showed that it was charging.

Test 3 - Raspberry Pi

I have a Raspberry Pi 4 that is in an Argon ONE v2 case (that has full size HDMI ports).  I was able to use the included HDMI to mini-HDMI cable and it worked fine.  On a later test, I was able to power the monitor and the Pi 4 using a portable battery bank that I had.

Bottom line: The FOOWIN monitor is pretty useful and the included cables makes this a nice little kit.  Just keep in mind there might be limitations on Android apps ability to display video, but otherwise it worked fine for the other scenarios that I tested.

Tuesday, October 18, 2022

GL.iNet Mini Smart Router Mango (Model GL-MT300N-V2) Thoughts

Lately most of my posts have been web3 related ( NFT / crypto ), but I decided to shift gears a bit.  I am not going to do a full deep dive review of this product, there are plenty online.  I did want to share my thoughts on the setup and use.

I purchased a Mini Smart Router ( Mango, model GL-MT300N-V2 ) from GL.iNet.  From time to time I would research OpenWRT compatible routers, and GL.iNet products would come up because they are OpenWRT based and many (but not all) seem to be supported by full OpenWRT releases.  I saw a good deal on Amazon and just decided to snag the Mango as a low cost entry point.

GL.iNet Mango ( GL-MT300N-V2 )

So first things first, I didn't have a pressing need for a travel router.  I have played around with OpenWRT on other devices ( RAVPower RP-WD03 and a Raspberry Pi 4 ) so I was familiar with the setup and use.  Ultimately I purchased the Mango as a cool gadget just for the fun of it.

Initial unpacking notes:
  • The device is small and light.  I expected it to be small, but it was lighter than I expected.
  • It comes with an Ethernet and USB-A to microUSB cable, which is a nice touch especially if you don't have many spare Ethernet cables.
Setup 1 - Initial setup

I didn't get creative here, I just followed the directions in the box.  My goal was to set the device up as a Wi-Fi repeater for my home network.  One thing to keep in mind, this device only supports 2.4 Ghz not 5 Ghz.  I was up and running pretty quickly with this option, the software is easy to setup.  Using Speedtest, my download speeds were a bit slower than connecting directly to my 2.4 Ghz network but still usable.  I looked around the interface, it seems much more user friendly than the LuCI interface on OpenWRT.

Setup 2 - Tethering

I wanted to try using the tether option via my smartphone.  Of course my phone can just run its own hotspot, but sometimes you just have to try things out.  I put my phone ( Pixel 6 Pro ) in USB tethering mode, and I was able to get it to work.  My first test had decent speeds, but that is because the Mango re-connected to my Wi-Fi (by default it will try to reconnect).  Once I disabled the reconnect option and tried again, I got the painfully slow speeds that I expected since my plan doesn't include high speed tether.  However the important thing is, the option worked.

Setup 3 - Access Point

For my next test, I just connected one of my extra LAN cables to the WAN port of my Mango.  I didn't have to change any settings for things to work.  I really like the fact that minimal configuration is required.

Android App

I checked the Play Store and an app ( https://play.google.com/store/apps/details?id=xyz.goodcloud.glinet ) that is actually pretty nice and seems to come from Gl.iNet.  From what I can tell you can access most of the same configuration options that you can via the web interface.  It has a "cloud" option that you can use to remotely connect/control, but I didn't test that.

NOTE: I tried to setup the Wi-Fi to support for WPA3 and after that I couldn't connect, luckily I just had to hold the reset down for like 10 seconds and set things up again which was easy.  Not sure why that didn't work, I will research it later.

VPN

This took a little more work to figure out how to figure, but I was able to configure the device as a VPN client.  The coolest part is that there is a switch on the side that you can use to manually turn the VPN on and off.

Additional thoughts

After using the device for a while and playing around in the interface, I noticed a few things that I thought were pretty neat:
  • The default setup seems to include mwan3 (Multi WAN load balancing).  So if you have Ethernet to one provider and Wi-Fi to another it can automatically switch between the two and I think it does some level of load balancing.  You can read up on that a bit more here ( https://openwrt.org/docs/guide-user/network/wan/multiwan/mwan3 ).
  • You can enable LuCI ( the default interface of OpenWRT ) to basically get more configuration options like you would with a traditional OpenWRT device.  This does not replace the GL.iNet interface which I actually like, it is just like adding a "power user" set of options.
Bottom line: So far I like the little router and might consider other GL.iNet devices in the future.

GL.iNet Product Page: https://www.gl-inet.com/products/gl-mt300n-v2/
Amazon Product Page: https://www.amazon.com/dp/B073TSK26W/

Friday, October 14, 2022

Floor - NFT Portfolio App

As I started to get more involved in the world of web3/NFTs, one of the areas I started to play around with was related to applications that let you see your portfolio of NFTs and wallet activity.

- Some apps would show the NFTs you own, and the total value of ETH but no activity.  If you had multiple wallets, you had to go into each one to see your view.
- Other apps did a good job of pulling all your collections into a single view or even showing collections, but not showing activity.
- I really like the Ledger Live app because I can see activity across multiple wallets on my Ledger, but it didn't really do a good job of showing my NFTs and it was limited to the Ledger wallets.  Most users that have a Ledger also have a software wallet, which was true for me.  So while I really like Ledger Live, I couldn't use it for my non-Ledger wallets.

So one day, in Discord (if your into web3/NFT chances are you hang out in many different servers) someone was sharing information on an app called Floor.  I like to try new things, and it seemed like it might work my goals so I decided to give it a shot.  For this app you actually have to have a pass, in the form of a NFT, so the person that shared the info actually send me a NFT to unlock the app.  This was already starting off to be pretty interesting!

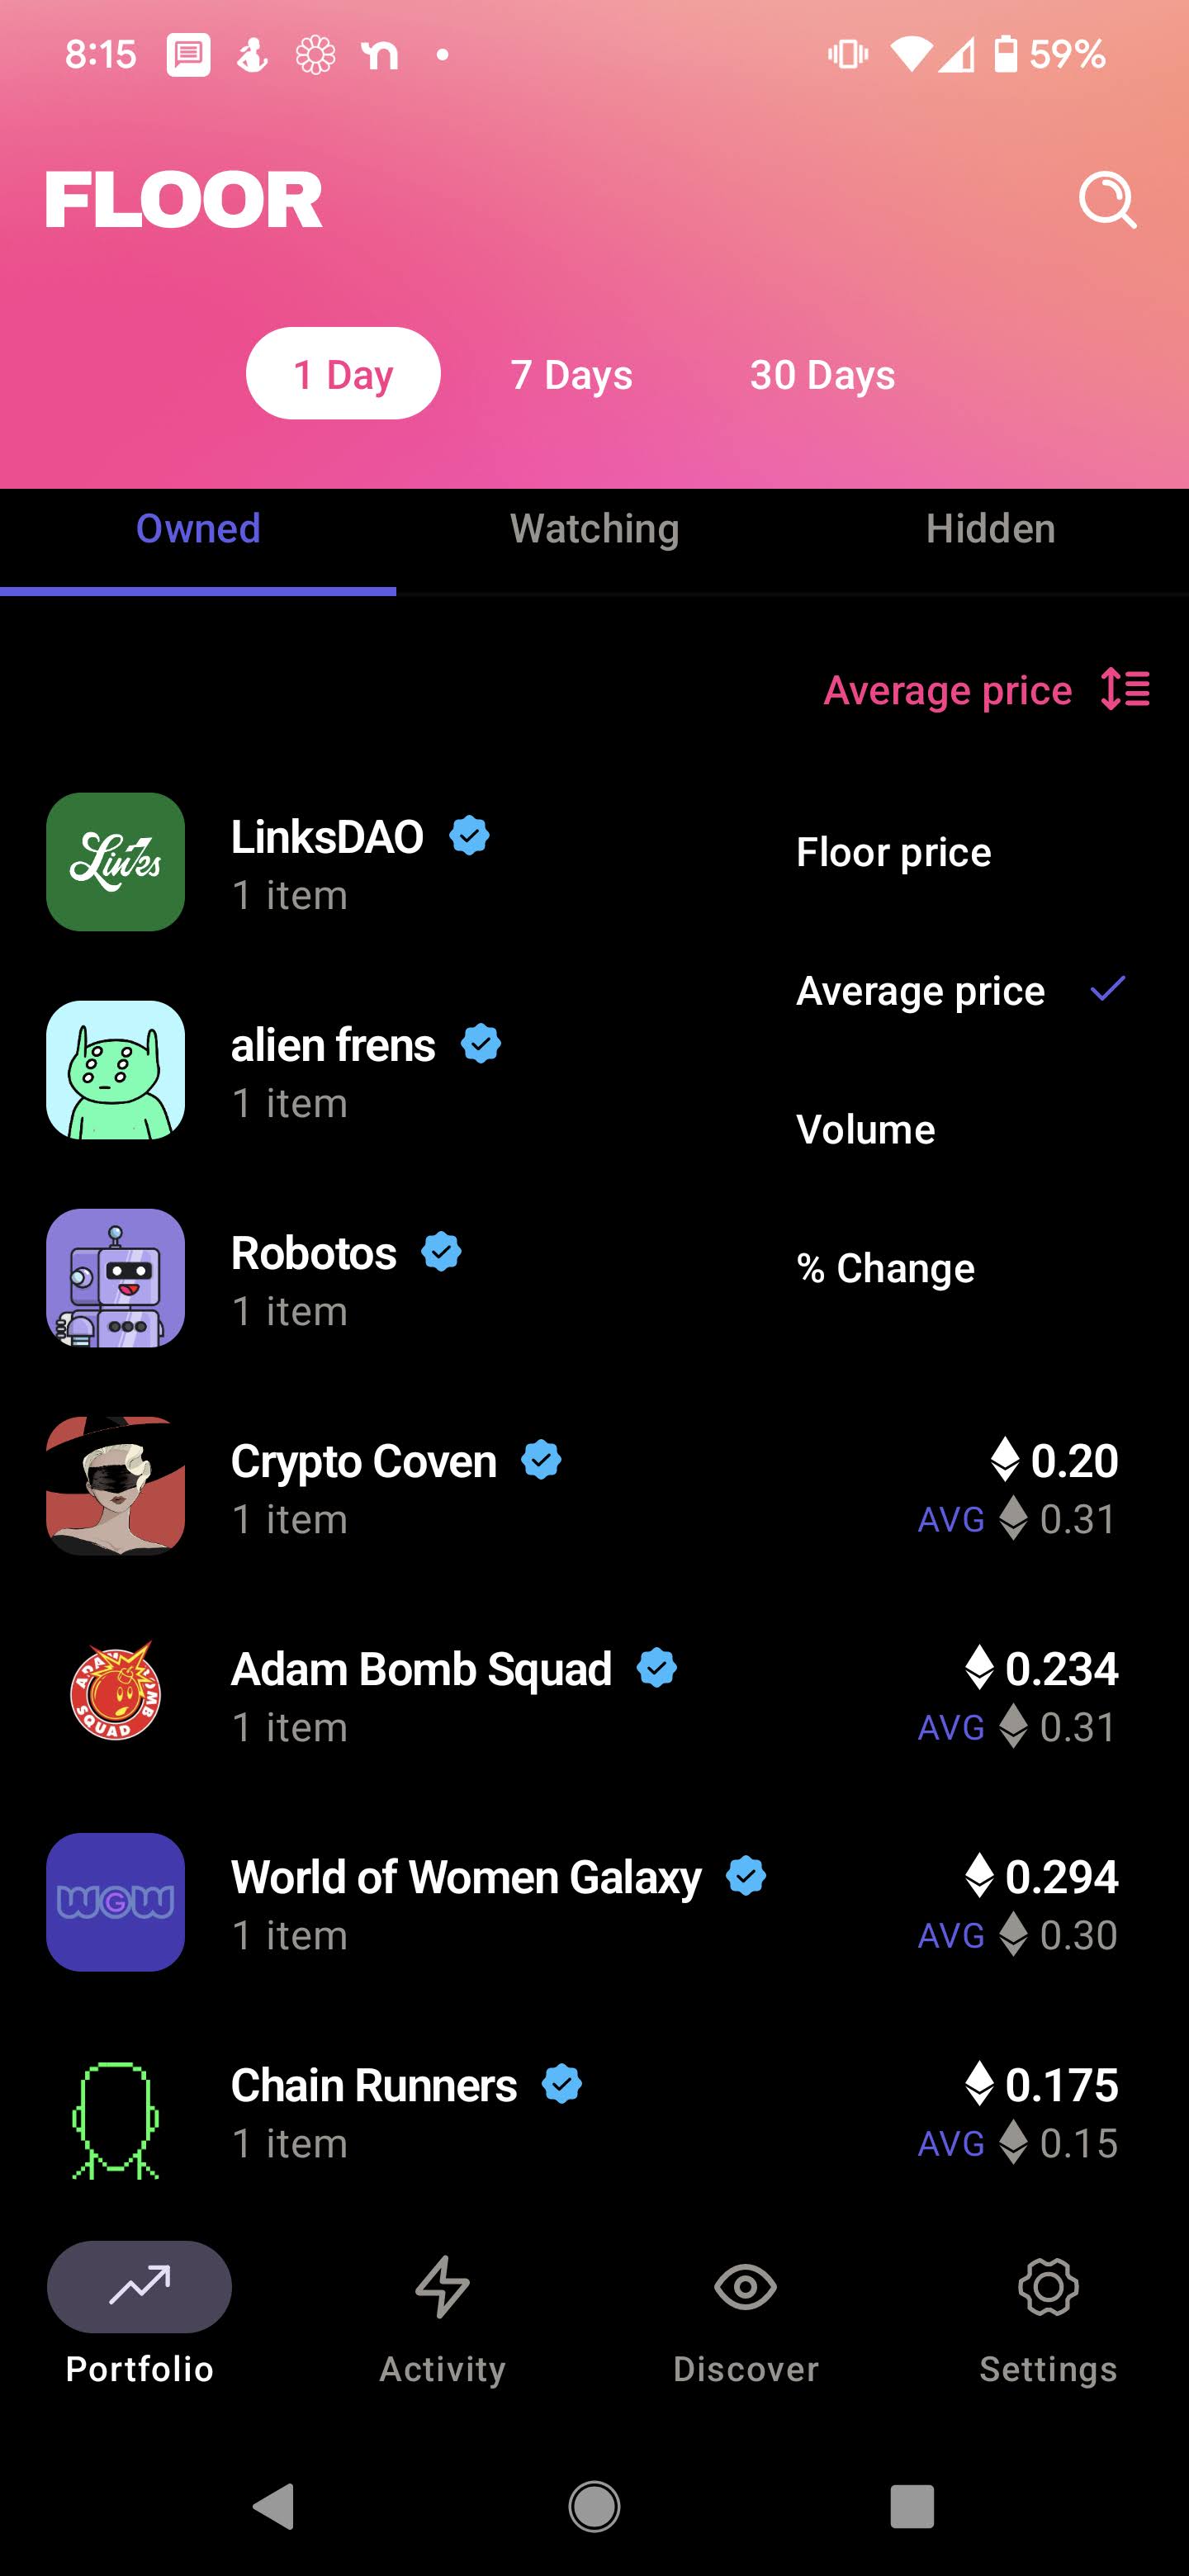
So, how is the app?  Here is a quick walk-through (NOTE - I used a demo wallet address, these are not my NFTs.  Screenshots based on Android version 0.21.4) with some of my thoughts:

Portfolio - Owned

Once you have the initial setup done, the app will open up to your Portfolio view.  Not only does it show you an estimated portfolio value for your NFTs, it also shows your ETH balance.  You can add multiple wallets.


As you can see above, you can sort you collections by Floor Price, Average Price, Volume and % Change which is a great way to keep an eye the collections which you own NFTs for.  You can also watch any collections that you don't own NFTs for, just to keep an eye on them.

Portfolio - Owned ( Collection )

If you click on a collection, you get 4 tabs at the top (note if you are only watching a collection and do not own NFTs you get the same tabs except "Assets".

Overview: This shows some high level information, details about the collection and various links such as "View on OpenSea" to look at the collection.


Assets: This shows the NFTs you own in the collection.


Activity: This shows recent activity in the collection including listing and sales which is a great way to keep an eye on things.


Listings: If you are looking to add more to your collection, or buy an item from a collection you are watching, this view gives you a quick look at what is available.


Activity

In this view you can see all the NFT activity across your multiple wallets.


Discover

In the Discover view, you get useful information.  Two of the main items you use see are Biggest Movers and Highest Volume.  This is a great way to keep an eye on what new collections might be worth keeping an eye on.


Settings

Nothing too crazy here, you can add wallets and adjust a few display options to your preference.


What else?

One of the things I like about this app/project is that the developers seem very open to feedback.  I have submitted multiple tickets with ideas/suggestions, and they respond often asking for clarification to ensure they understand my request.  I doubt you will get that with many other tools.

So back to where I started, the person who granted me access was actually part of a program they have where people who want to share this app can share it with others.  If you read this far, then maybe you are interested in trying the app?  It doesn't cost anything - you don't even have to pay gas to get the NFT!

If you want my help, all I ask is that you sincerely have an interest in this type of application and that you plan to use it.  As far as I know, I don't get any sort of "kick back" for bringing a new person in - I just really like sharing useful information, which is really what drives me to post on my blog.

If I sent you this link, just let me know if you are interested.  If you ran across it randomly, keep an eye on this page and I will add a way to contact me.  You can also post a comment to let you know you are interested.  Let me know your twitter handle, and I will message you.

Saturday, September 17, 2022

ENS Subdomains

Earlier this year I wrote a blog post about Web3 identity.  At the time I touched on ENS, but didn't really dive into it much.

I finally decided to register my own ENS name, and one of the features I found pretty cool was the ability to create subdomains.  So let's say you register "example.eth" as your domain.  You could create a subdomain (in the format subdomain.example.eth).  You don't have to pay another registration fee, just a little gas.  You can even assign ownership of a subdomain to another person.

So why would you do this?  Here are a few reasons
  • You can make a .eth subdomain specific to a project ( blokpax.example.eth )
  • You can make a .eth subdomain specific to your Discord ID
  • You can make a .eth subdomain for friends/family
  • You can make a .eth subdomain for each wallet/purpose ( freemint.example.eth, vault.example.eth )
  • Each domain can have a different address and even different controller.
If you already have an ENS domain, you can create a subdomain by doing the following:
  1. Go to ( https://app.ens.domains/ )
  2. Click "My Account" top right
  3. Under either "Registrant" or "Controller" find the domain you want to add a subdomain to and click it.
  4. Click "Subdomains" and click "Add Subdomain"
  5. Put in the name you want and click "Save"
  6. Pay the gas and that is basically it.  You can now manage the subdomain like your main eth domain.
One heads up / warning.  If you get a subdomain from someone else (person or project) just keep in mind they have the ability to take the domain back.

I hope this information is useful!  I will revise/add info if I get any questions.

Saturday, September 10, 2022

Ledger Nano S Plus - Setup and initial thoughts

I recently obtained a Ledger Nano S Plus.  It was custom branded for Tribe X, one of the NFT projects that I am participating in.  The packaging was very nice and simple, it included the device itself, paperwork, a USB A to C cable and a keychain loop.


Setup - Initial setup

I went to www.ledger.com/start to get the process going.  For my first test/setup, I was just going to create a new wallet like a normal new user would.  The process went pretty smooth, and I was up and running on my Ledger pretty quickly.

A few recommendations:
  • Make sure you pay attention to the setup screen information, it is useful especially for a new user.
  • Make sure you write down your recovery phrase on a paper, do not store it in a file on your computer - that would defeat the entire purpose of an offline/cold wallet.

Setup - Recover prior software wallet

First, let me say that my next test was just a test and you should NOT do this for actual long term use of your device.  I already had a prior software wallet, so I decided to recover that wallet onto my Ledger.  This is a HORRIBLE idea from a security perspective since it defeats the purpose of a hardware wallet but for testing it was fine.  As expected all my old stuff showed up fine, so I plan to use this setup for testing to see how it impacts things for me.  Most of the services I deal with support WalletConnect, which is supported by Ledger Live (the desktop/mobile app that interfaces with the Ledger device).  I had one site that doesn’t support WalletConnect, but MetaMask did work.  The only thing I don’t like is you can’t get to the point of using Ledger in MetaMask if you don’t have a MetaMask account setup.  However for most users, they likely have a MM account so this shouldn’t be a problem.

FIDO U2F Support

While the Ledger is mainly focused on crypto, it does have a feature that users should look into a security capability for their online accounts.  The Ledger can support FIDO U2F (two-factor authentication).  You can read up on Ledger’s info on this feature here ( https://www.ledger.com/fido-u2f/ ).  If you read my blog, you know that I have tested Yubikey hardware tokens.  For the Ledger implementation, two things stood out as interesting:

  • The Ledger is PIN protected, so someone can’t use your hardware token if they don’t know your PIN.
  • You can restore your recovery phrase on another Ledger wallet and get access to your FIDO U2F again.
From a security standpoint the ability to recover your key onto another device means that if someone gets your crypto private key, they can restore onto a Ledger and also get access to your FIDO U2F so depending on how paranoid you are that might be a bad thing.  However it also means that, as long as you know your crypt recovery info you can always restore your FIDO U2F access on a Ledger device.

Thoughts so far

The increased security adds some complexity to the process.  If you are used to just having a software wallet like MetaMask, you now have to remember to keep your Ledger nearby.  However the increased security, keeping your key on a hardware device and not in your software, is worth it for anyone in the crypto/NFT world in my opinion.  Remember, this helps to secure your private key but you still have to be careful with the sites you interact with.  Ideally you keep your hardware wallet for “trusted” sites and never use it for minting and maybe do your minting type activities on a software wallet to keep some separation.  If you already have a software wallet, just move your valuable NFTs to your Ledger and keep using the software wallet for minting.

Sunday, April 10, 2022

Displaying your NFTs

Once you get into the world of web3/NFTs, sooner or later you are going to have at least a few NFTs that you want to let others see.  For a little background, as of right now my NFTs are on Ethereum and Polygon so my tests only consider those networks.  Note, I made sample galleries on each option but as time goes on I could end up no longer using certain options.

Unstoppable Domains (UD)

UD has two ways you can show off your NFTs:
One interesting thing about the NFT Gallery is that the gallery is created on a decentralized website, so this is also a chance to see a real example of how that works.  However, due to lack of Polygon NFTs or controls over which to show/hide, this isn’t an option I plan to use.

My UD Sample:
UD NFT Gallery: Go to the profile above and then click “Go” under “Website”

If you plan to set up your own UD domain, use my referral link to get $10 off with a purchase of $40 or more.  UD referral: https://unstoppabledomains.com/?ref=8dc35e49ca2d4a7

Nametag.org (NT)

Right now, Nametag is one of my favorite options for showing off NFTs because it is right on my NT profile which is sort of my web3 profile page.  There are a few ways you can show off your NFTs:
  • Your profile/avatar on your NT profile can be set to a NFT, and it doesn’t have to be from a verified collection.
  • You can select a NFT to be your profile background
  • You can pick multiple NFTs to show (or hide) so you can control which NFTs you share.
As of right now, NT doesn’t support Polygon but I believe it is in the works.  Additionally NT isn’t open to public minting, so you have to be part of a collaboration project to mint your Nametag.


Lazy.com

Unlike UD and NT which are more of a “profile” page with additional information, the Lazy.com option is just for NFTs.

Key points
  • Supports Ethereum and Polygon NFTs
  • You can hide certain NFTs so they don’t show up, and you can also “pin” a NFT so it shows up at the top of your page with a caption.
  • Not all my NFTs show up, so I think there might be an issue with my account or some limit of NFTs that it can pull in.  I reached out to support with no response, if they do respond and fix the issue I’ll update this post.
My Lazy Portfolio: https://lazy.com/vojimen

OnCyber

This one takes a unique approach compared to the other options I looked at.  Basically you are setting up a 3D/VR gallery to show off your NFTs.  I guess I like simple things so I wasn’t a huge fan, but the concept is cool and feels like an art gallery/museum.  I just don’t know if people will actually move around and look at everything, but maybe people are more patient than I am.

Key points:
  • Uses a 3D/VR style gallery, feels like an art gallery.
  • Supports Ethereum and Polygon NFTs
  • You pick which NFTs you show off, but it is a one by one process.

Bottom line: Ultimately there are many options to display your NFT collection, and the decision on which is best will probably be driven by personal preference and features that are important to you.  Don’t forget you can always just share your OpenSea profile if you don’t like the options above.

If you haven't seen my blog post about web3 identity make sure you check it out ( https://bigboystoys13.blogspot.com/2022/03/web3-identity.html ).

Links for the various options: